I’m learning about cars through my 1974 VW Beetle. This is my initial report.
Condition when purchased
When I bought the car, it did not start. The battery was dead, and when we jump-started the car it would not run for very long. According to the owner the engine was fairly new, but had been sitting for close to 2 years. I had test driven so many of these cars that I could at least tell that the body was pretty solid. It had some minor rust spots but nothing major. Everything the owner had said was plausible. So I made a deal to have it towed to a garage, and base the price on what the mechanic’s inspection.
The mechanic confirmed almost everything the owner had said, with a couple exceptions. So we negotiated a price and then I had them fix those issues.
Current Condition
The mechanic gave me a summary of the issues to get the car running. I had them fix the minimum amount to get the car home.
The initial assessment:
- Bad battery (immediately replaced)
- Distributor and Ignition Coil
- Bad gas from sitting
- The ignition switch is very temperamental
For each part I replace, I plan to research and explain what it does. So I am learning about the car as I replace parts.
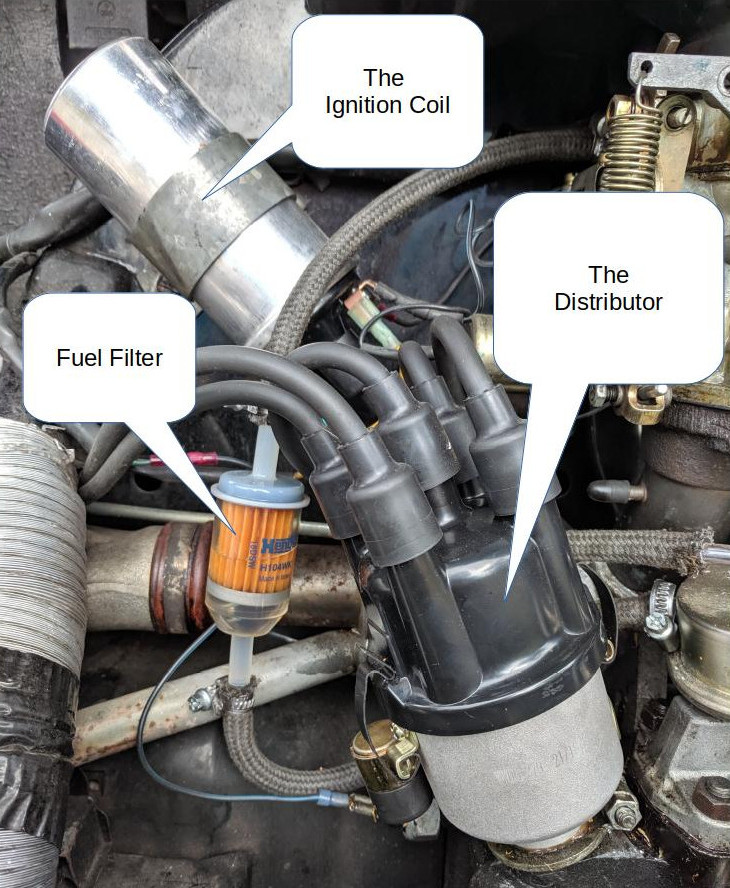
The Ignition Coil
An Ignition coil transforms the battery’s low voltage to a high voltage. This is required to create a spark for the spark plugs to ignite fuel. At it’s simplest form it’s an iron bar with 2 separate coils of wire wrapped around either end:
- The first, or primary wire is only wrapped around the iron a few hundred times
- The second, or secondary wire is wrapped around many thousands of turns more
When an electric current (from the battery) is passed to the primary, a magnetic field is generated. The field stores the energy and it builds up. When the current in the primary is interrupted, it transfers its energy to the secondary coil. This causes a spark to jump across the air gap between them.
As stated earlier, this spark is what is needed to ignite fuel in the engine’s cylinders. You might remember that an engine has more than one cylinder. That’s where the distributor comes in.
Read more:
The Distributor
The Distributor transfers the high voltage from the coil to the correct cylinder. Since there is more than one cylinder in the car, it must “distribute” the voltage to the correct cylinder at the correct time.
This is done with a rotor system spinning inside the cap of the distributor. There is a contact inside for each cylinder. As the rotor spins past each contact, the electrical pulse is transferred to this contact. This transferred pulse is sent to the spark plug attached to the correct cylinder.
As you can imagine, the timing of this process is very critical. These parts will wear out because of the high voltage involved. Weird things start happening when the timing is off. When you get a tune-up, one of the things they will replace is the rotor and wires.
In modern cars they do not use distributors anymore to distribute the energy from the coil. Instead they use smaller coils – one for each spark plug or one coil for every 2 spark plugs.
I thought it was interesting that in cases where 1 coil serves 2 spark plugs, they use a technique called “wasted spark”. The coil generates 2 sparks per cycle to both cylinders. Yet, only one works to ignite fuel, the other is wasted since the cylinder isn’t ready.
Read more:
Bad gas
How does gas go bad? It has to do with the complicated recipe used to make it. I’m going to gloss over the details, but it’s a somewhat interesting process. I recently watched an episode of Modern Marvels about gasoline. I would recommend you do anything else than watch a TV show about gasoline. But if you’re bored you might find it interesting.
If you store gas for too long, the mixture tends to break down. Some hydrocarbons evaporate out of the gas. Heat, oxygen, and humidity also influence the mixture. After time it starts to form solids called gum, which can start blocking the fuel lines.
Read more:
- Modern Marvels Season 8, Episode 29 Gasoline – https://www.youtube.com/watch?v=pxpa1ad8qkU
- https://www.livescience.com/58117-does-gasoline-go-bad.html
Getting rid of bad gas
It may not be enough to drive off the bad gas – the fuel has left deposits all throughout your system. Water may be present from heat changes and humidity. Water will separate from gasoline, and it’s bad for engines. For example. it can freeze in supply lines as low temperatures.
You could have the old gas flushed out of your system, but it is an expensive process.
A cheaper method is to use a fuel additive, such as a product called Seafoam. It will clean the fuel system of fuel deposits. It seems to have a solid fan base of people who swear by it. There are other brands that do the same thing, and I’m not interested in promoting one product. The term “fuel additive” is a vague term, there are other additives that have different benefits. So I’ll use the terms “fuel additive” and “Seafoam” interchangeably.
How do fuel additives work?
It is not easy finding how an additive like Seafoam works. I found some people who try to make a home-brewed version. I have no interest in making my own additive, but it was helpful to understand how it works.
The mixture of the additives are 3 basic ingredients:
- Pale Oil – a kind of mineral oil that assists in lubrication
- Naphtha – a liquid hydrocarbon mixture that assists with cleaning. It has a variety of uses, such as kerosene or to dilute heavy crude oil when shipping. I believe it helps clear gum and varnish by diluting them, and by making the gas burn a little hotter
- IPA (or Isopropyl alcohol). It’s a drying agent. It causes water in gasoline to become soluble, and will be consumed with the fuel when burned.
How to remove bad gas
This is the process required for cleaning my fuel system:
- Replace your fuel filter
- Add some fuel additive, such as Seafoam, and fill the tank with a high-octane gasoline
- Run through the tank
- Add more Seafoam, re-fill the tank with high-octane gas, and replace the fuel filter
- Run through the tank again
- Re-fill the tank with normal gas, and replace the fuel filter
Essentially you run through two tanks of fresh gas, replacing the fuel filter in between each tank.
Read more:
- Seafoam – https://mechanics.stackexchange.com/questions/15653/what-is-seafoam-what-does-it-do-how-do-you-use-it
- A discussion about Seafoam – https://www.bobistheoilguy.com/forums/ubbthreads.php/topics/269397/1
- Homebrew Seafoam – http://hildstrom.com/projects/seafoam/
- Naphtha – https://en.wikipedia.org/wiki/Naphtha
- IPA – https://en.wikipedia.org/wiki/Isopropyl_alcohol
Fuel filter
The function of a fuel filter is straight forward. It’s attached to your fuel line between the fuel tank and the engine. It keeps dirt and other large particles out of your engine.
The ignition switch
I’m living with it for now, but it is rather temperamental. While trying to start the car, I may need to wiggle the key, sit and wait, or recite poetry.
There is a chance that the real issue is that the car sat for so long. It may only need to be driven for a while and the ignition will work itself out fine. We will see.