
How I programmed an Arduino to accept a button press and then ignore subsequent button presses
I am working on an art project that involves a button. The button will start the device, but ignore any extra button presses for a set amount of time. This post focuses on my small journey, and a few things I learned along the way.
My Background
I have a very basic knowledge of electronics. I have an Arduino starter kit, and I played around with the tutorials until I understood the basics. After that I moved on. I figured I could always pick it back up again if needed.
The Requirements
- Start a garage door opener (I’ll refer to it as the “opener” from now on)
- Use the opener’s wired-button terminals/leads/pins to control it. These are the same leads that you would use hook up to a button on the wall in your house to use your garage door opener.
- The opener has 2 terminals/leads – if they touch together, the opener will start
- Use a button to communicate with the Arduino. It will decide if it should (or should not) use those terminals to start the opener
Hardware
I need 2 buttons: One to communicate with the Arduino, and the other one controlled by the Arduino. To do this I need something called a Relay.
What’s a Relay
A Relay is a fancy switch that is controlled by electricity. It does this with an electromagnet. Imagine a light switch – you add some parts so that if you hold a magnet to one side, the switch will flip. Take the magnet away and the switch flips back off. Wrap that into a box and you have a relay.
- If no electricity is running to the Relay, then there is no magnet. The switch is off
- If electricity is running to the Relay, then the electromagnet is on. The magnet attracts the switch to the other side and turns the switch on
You can hear a Relay when it switches. It makes a distinct “click” noise. You find them in a lot of everyday things, like your windshield wipers.
That’s the basics. Yet there are a few more features:
- The Relay can do the exact opposite. It can be ON when no electricity is running, and turn OFF when the electricity is on
- Relays are used to operate high voltage electronics, while protecting sensitive equipment. The Arduino can only handle about 5 volts. It could never power a household light bulb. To do this you wire the light bulb with the full power, and use a relay to control that power. The Arduino is safely behind the Relay, protected from the high voltage.
A relay typically has 5 pins:
- Input 1: the positive (+)
- Input 2: the negative (-)
- a common (or COM): this is one half of the thing you are switching
- Normally Closed (or N/C): when power is on, the switch is on
- Normally Open (or N/O): when power is off, the switch is on
I read a couple articles before this started making sense to me. This one helped me the most: https://www.instructables.com/id/How-Electronic-Switches-Work-For-Noobs-Relays-and/
My Relay
My Relay had no labels and looked different from most of the tutorials. I figured it out by connecting a couple alligator clips to a 9v battery. After connecting them to the pins on the relay, I listened for the click of the magnetic switch. After that I used my volt meter to determine which pins were Normally-Closed and Normally-Open.
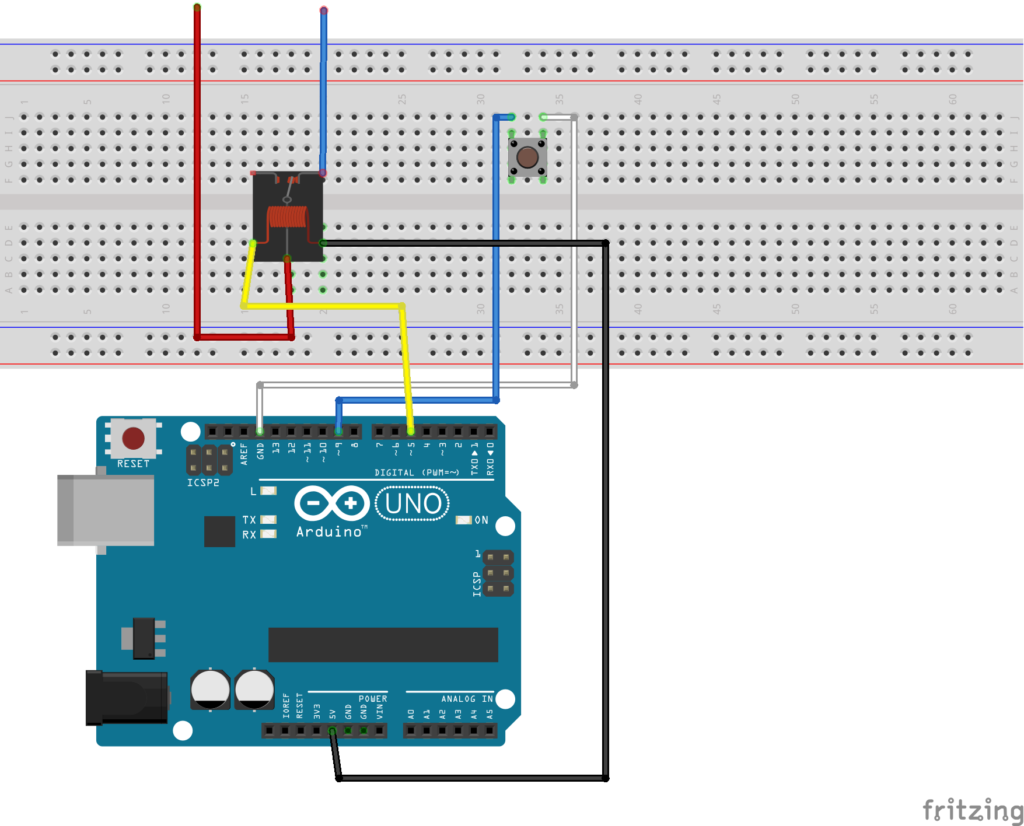
The hardware layout
Relay Setup:
- I connected my ~5 on the Arduino to one pin on the relay, and 5v on the Arduino to the other pin
- The Common (middle) lead connects to one terminal on the garage door opener
- The N/C (Normally Closed) pin connects to the other terminal on the garage door opener
Button Setup:
- The button setup is like all the other button tutorials
- I connected ground (GRD) on the Arduino to one end of the button
- I connected ~9 on the Arduino to the other end of the button
The Code
Intended behavior:
- When the button is pressed (or LOW) on ~5, I trigger a “button press” using the relay for the garage door opener (it starts)
- I then run a
delayfor a set amount of time- the
delayallows my code to ignore everything until after thedelayhas finished
- the
Quick notes:
- I use the built-in LED on the Arduino to show when it is ignoring button presses (LED_BUILTIN)
- I write debug messages to the serial. Not a big deal but it makes the code a little more busy looking
/**
 * Ignore button presses after accepting the first, for a set amount of time
 * Jason Jerome
 */

int gDoorPin = 5;
int buttonPin = 9;

String msg = "seconds to wait: ";
int secondsToWait = 20;

void setup()
{
  Serial.begin(9600);
  pinMode(LED_BUILTIN, OUTPUT);
  pinMode(gDoorPin, OUTPUT);
  pinMode(buttonPin, INPUT_PULLUP);

  digitalWrite(gDoorPin, HIGH);
  Serial.println("Hi - ready");
}

void loop()
{
  if (digitalRead(buttonPin) == LOW)
  {
    Serial.println("button pressed");
    digitalWrite(LED_BUILTIN, HIGH);

    startOpener();

    Serial.println(msg + secondsToWait);
    delay(secondsToWait * 1000);

    Serial.println("done - ready for more");
    digitalWrite(LED_BUILTIN, LOW);
  }
}

void startOpener() {
  Serial.println("gDoor - activating");
  digitalWrite(gDoorPin, LOW);
  delay(500);
  digitalWrite(gDoorPin, HIGH);
}
Here’s a video of it in action:
This has been a fun project so far. I’m very happy to have most of the electronics figured out so early in the process. I can now move on to designing and building the other parts!