Temporary Walls

Build a home office on the cheap

aka Temporary Walls

I built some temporary walls to create an office in my basement.

The Back story

I was renting a small office for contract work, and decided to move home to save some money. The only available space was our unfinished basement. It was too large to keep warm in the winter, so I came up with an idea of creating cheap walls to make a room.

A small office in the basement also had the advantage of creating 2 layers of separation with the house. It’s too easy for someone to accidentally open a door during an important meeting. It’s much harder to open the door to the basement, walk down the stairs, wander over to the corner office, and peak inside.

I started my research and came across this old article about creating temporary walls in a house. It started me in the right direction: https://www.thisoldhouse.com/ideas/instant-extra-bedroom

One of the walls

Building

Step 1: the walls

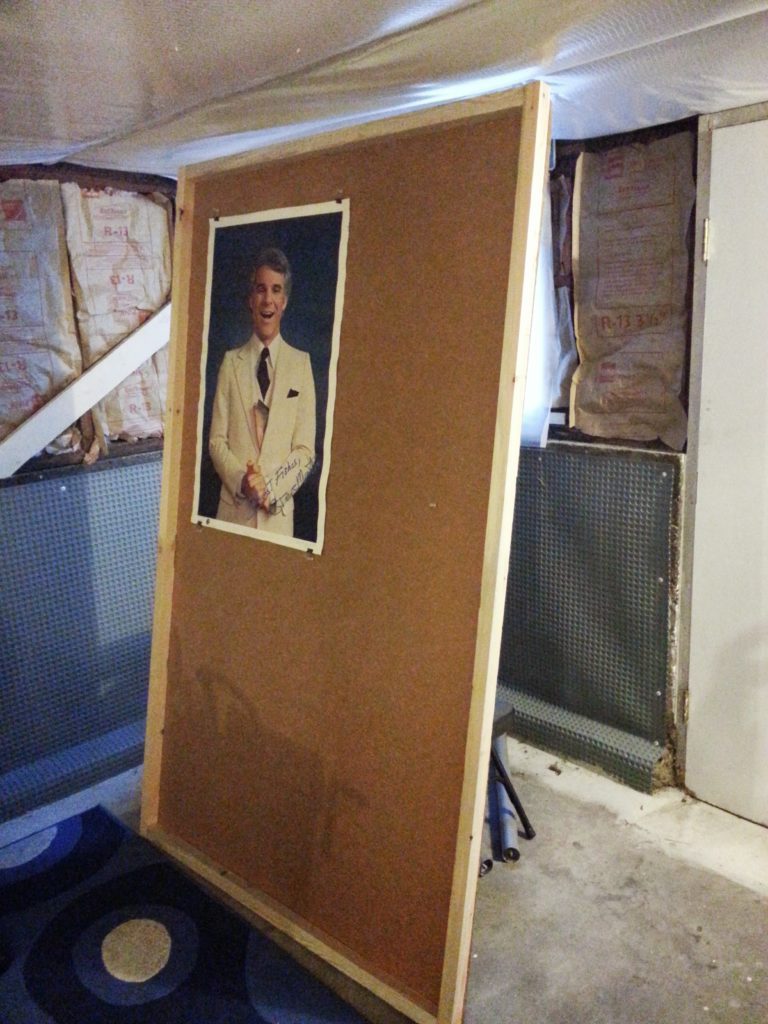
The wall material is a cheap lightweight sound proofing material called Homasote. It’s a very lightweight highly-compressed paper-mache material. I found a bunch at my local used building materials store.

Step 2: measure your height

I measured the height of the basement ceiling and made each wall an inch shorter. I also made sure I could move them in, out, and around the basement without too much trouble.

Step 3: the frame

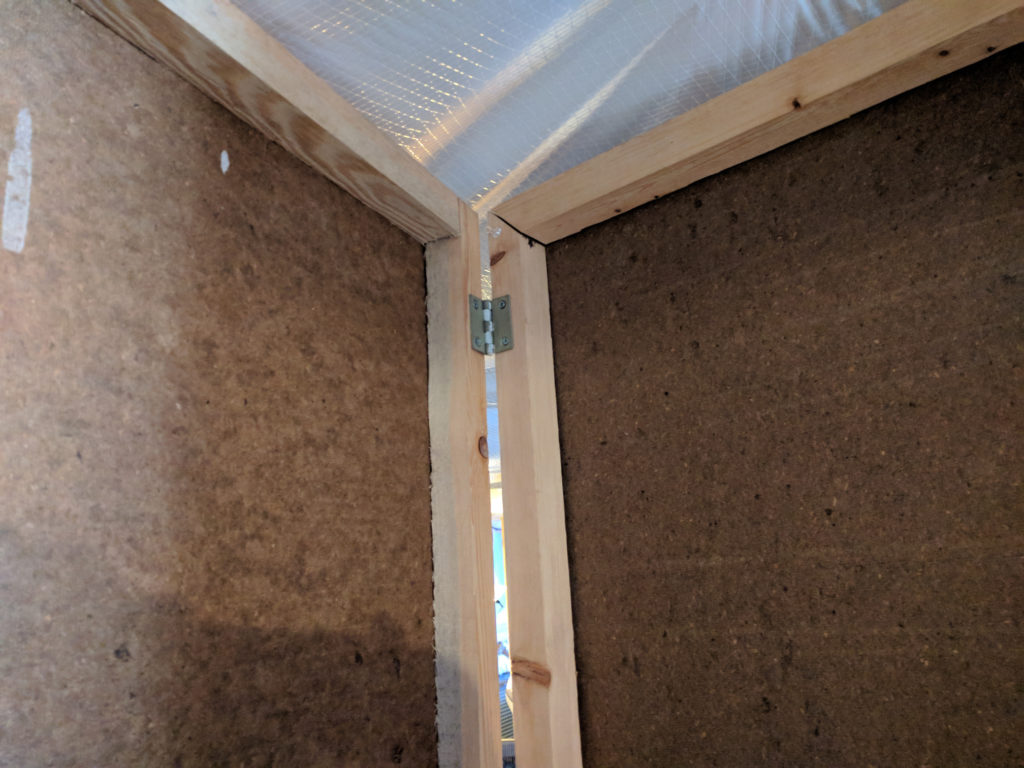
I built the frames using 2×2 wood boards. I constructed a simple frame around the edges and then screwed the Homasote sheet to the frame.

Putting it all together

I struggled for a while with how to hold the walls in place. I didn’t want them to fall over. In the article they used furniture levelers, but I found them a little pricey.

My solution was to build a couple walls at right angles. I then made sure any straight wall was attached to a right-angled wall. In places where a wall was a little wobbly, I wedged a piece of wood perpendicular between the ceiling and wall.

A right-angled wall. For this one I used hinges.

What about a door?

There was no way to create a proper door, but I came up with a good solution. I left a door-sized gap that would serve as the entrance, and hung 2 wool blankets on either side of the doorway. This made for a rather heavy blanket door that did not let in any drafts.

Heat

The basement wasn’t heated, so I used a strategy involving 2 electric heaters to keep warm:

  1. A radiator-style electric heater provided most of the base heat. I had it hooked up to an industrial timer that would turn on the heat a half hour before I started work.
  2. An electric fireplace heater that had a temperature control and remote. I used it to dial in the heat a little better, and as a bonus I had some fake flames to look at for some ambiance.

The office worked very well over the years. I even incorporated a portable air conditioner. Often times I would come up to grab a snack and my wife would remark that she didn’t even know I was home.

If you are looking for a cheap way to create some separation in a room, this could be a good solution for you.

Hugo CMS

Update: I stopped using Hugo. I still like the idea of a static website, but it had some downsides that did not work well for me:

  • These kinds of static site generators require a local repo, and you generate/build the site. I use too many computers between work/home and things got stale rather easily. I would forget details of the setup all the time.
  • Every time I make an update, I had to re-build the complete site. This required that I had to upload the entire site via FTP for every single thing I updated. As time went on it took longer and longer to make an update.
  • In short – as with most things – maintenance killed it

Hugo

The following is my summary about how I setup Hugo for a website. If you are looking for basic information, please refer to the official documentation. Sometimes it helps to view the same content in someone else’s words.

This page represents a quick summary of my notes. I am not an expert in Hugo, nor do I know all its features. If you are here looking for help doing something, you should read this and other sources to gain a good understanding of what you want to do.

Quick Summary

Setup a new hugo site:

  hugo new site mywebsite
  • Don’t forget to download a theme from their website
  • The site’s main configuration file: config.toml (you set the theme here)

Create a page:

  hugo new posts/my-first-post.md
  • Notice you include the location of where to create the file

Run a test server:

  hugo server -D`   
  • -D means to show all pages marked as draft
  • Leave the -D off if you want to only see published content (i.e. pages not marked as draft)

Build the final site:

  1. Remove anything in the /public folder
  2. Run command hugo
  3. Copy everything in /public folder to your web host

Themes

Browse and download a theme from Hugo’s website.
I choose a theme called Minimal

  • A good theme has a good README on their github page explaining how best to customize it
  • Themes want you to git clone their project. This hasn’t been the greatest experience for me. Instead I download the theme myself and place it in the theme folder

Customize your theme

With Hugo you can override any file in the theme by making a corresponding file under the /layouts folder.

For example, to change the theme’s footer file:

  1. Find the file in the theme: /themes/minimal/layouts/partials/footer.html
  2. Copy it to your layouts folder: /layouts/partials/footer.html
  3. Edit the copy in the layouts folder
  4. You’re done!

Pages

Each page in Hugo defaults as a list type.

  • If you create one file in a folder, then it’s the only one and acts like the index.html file.
  • As soon as you create 2 files, the index of that folder changes and it lists all files in the folder in blog-like fashion

All pages have a small section at the top for settings and variables called “Front Matter”

  • All new pages have a draft: true. The page will not show on your published site until you change it to false.

Customizations

An About page with no date

I created an About page. I noticed that a single page in Hugo (with theme Minimal) still shows the date. I thought that looked rather silly so I made some modifications. This might not be the best way to achieve what I wanted.

  1. Hugo as a section called “archetypes”, which are default settings for the type of pages you can build. I modified my /archetypes/default.md to include a new variable: showthedate: true. Every new page I make has this variable in it.
  2. I found the file in the theme that was displaying the date. In my case it was a file called /themes/minimal/layouts/partials/list-item.html. I copied the file into my layouts folder: /layouts/partials/list-item.html
  3. I made this change in the file itself:
  {{ if .Params.showthedate }}
  {{ .Date.Format (.Site.Params.dateFormat | default "January 2, 2006") | $.Scratch.Set "subtitle" }}
  {{ end }}
  • All this does is hide the date if my page has my showthedate variable set to false
  1. In my about.md page, I set the variable:
  ---
  title: "About"
  date: 2017-10-20T21:56:50-07:00
  draft: false
  showthedate: false
  ---

  I have been making...

Open Header icons in new tab

(instead of in the same page)

I wanted all icons in my header, such as Twitter, Stacked Overflow, etc, to open in a new tab (or window). This is another example of finding the file in the theme, and overriding it by placing a modified copy in the /layouts folder

  1. I found the spot where the theme generates the icon links: /themes/minimal/layouts/partials/header.html
  2. I copied it to my local layouts folder: /layouts/partials/header.html
  3. I added a target="_blank" parameter to the link tag (super simple MVP-like stuff)
  <li class="navbar-icon"><a target="_blank" href="{{ .URL }}"><i class="fa fa-{{ .Name }}"></i></a></li>

Create a static landing page

By default the theme shows your blog posts on the main landing page (i.e. http://www.jjerome.com/). I wanted my main landing page to just show a welcome message. Again, fairly easy to do by overriding the theme.

  1. I found the spot in the theme: /themes/minimal/layouts/index.html
  2. I copied it to my layouts folder: /layouts/index.html

This page is a little weird, because it’s not a markdown file like the rest of the site. I didn’t dwell on that fact for too long. I just made my changes and moved on.


You can see all my code in my github repo

Disable the beep on your Mr Coffee

Silencing your Mr Coffee FTX21 (or FTX25) for good

After 9 years, I finally had enough of the loud beeping coming from my Mr Coffee machine. Like most things, it started out small and built up until I couldn’t take it anymore. I often wish these things had a mute button.

During my research, all I was able to find were others complaining about the same problem. This was comforting, but didn’t solve the problem. The following link got me started on the solution I came up with: Disable the obnoxious beeping on a Mr. Coffee, Model JWX27

Attempts

I thought it might be a clever idea to find the speaker and disable it. The coffee maker could continue going about its business and never make a noise again. I discovered the electronic components (circuit board) are sealed inside the machine. I guess that’s a good idea considering how much moisture it deals with on a daily basis. But it would not help me with my problem.

Working towards the solution

I did not give up. I brewed a few test-cups and listened to determine the location of the speaker inside the unit. My wife walked into the kitchen and saw me with my ear against the coffee maker, and didn’t even flinch. I guess she is used to this behavior by now.

So it’s come to this, MR BOND

After I determined the spot where the speaker was, I drilled a pencil-width hole into that spot. To my luck I discovered there was some space between the outer wall and the circuit board. This allowed me to drill a couple more holes (3 total) to get a better look.

I discovered a circular disc below where I drilled the holes – this was the speaker! While it was beeping, I poked it with a screwdriver and the sound fluctuated with my prodding.

To finish the job, I brewed another test pot and while it was beeping. I carefully pried the disc away from the circuit board until the machine fell silent. No more beeping! I feel both ecstatic and lame at the same time!

You can make out the plastic disc speaker below the surface

Conclusion

My only hope is that this inspires more people to take ownership of their electronics. Also, keep in mind that there are plenty of good coffee machines for sale at your local Goodwill.

I know this is kind of lame, but I think it’s a good example of having the courage to take ownership of our electronics. Drilling a hole to remove a speaker is a lot cheaper than buying a new coffee maker. Buying a new coffee maker so it won’t wake up your entire household is a waste.

Also, keep in mind that there are plenty of good coffee machines available at your local Goodwill. You will spend less money, produce less waste, and help a good cause at the same time.